
How to Inject Ozempic at Home: Step-by-Step Patient Guide
Learning how to inject Ozempic at home can feel overwhelming at first, but with the proper preparation and technique, most patients quickly gain confidence in self-administering their medication. Ozempic (semaglutide) is a once-weekly injectable medication used for the management of type 2 diabetes and, in some cases, for weight management. This comprehensive guide walks you through every step of the injection process, from gathering your supplies to proper disposal, ensuring you can administer your medication safely and effectively.

What You Need Before Starting Your Injection
Before starting your injection, gather all necessary supplies to ensure a smooth and organized process. For more background on Ozempic therapy, refer to our Ozempic Injections: A Patient's Complete Guide. Having everything within reach reduces stress and helps you maintain proper sterile technique.
Essential supplies include:
- Your Ozempic pen (stored in the refrigerator until first use)
- A new NovoFine or NovoTwist needle for each injection
- Alcohol swabs for skin preparation
- A sharps disposal container
- Cotton ball or gauze (optional, for after injection)
- A Digivibe device (optional but recommended for comfort)
Check that your Ozempic pen has not expired and that the solution appears clear and colorless. As you learn how to inject Ozempic, if you notice any discoloration, particles, or cloudiness, do not use the pen and contact your pharmacy for a replacement.
Step-by-Step Guide: Preparing Your Ozempic Pen
Proper preparation is crucial when learning how to inject Ozempic correctly. Follow these steps carefully:
Step 1: Wash your hands thoroughly with soap and water for at least 20 seconds.
Step 2: Remove the pen cap by pulling it straight off. Do not twist it.
Step 3: Check the dose counter on your pen to confirm it displays the correct amount.
Step 4: Attach a new needle by removing the protective tab, then screwing or pushing it straight onto the pen until secure. Remove both the outer and inner needle caps, keeping the outer cap for disposal.
Step 5: Prime the pen before your first use or if it's been more than one week since your last injection. Turn the dose selector to the flow check symbol. Hold the pen with the needle pointing upward, and tap the cartridge gently to move air bubbles to the top. Then, press and hold the dose button until a drop appears at the needle tip. Understanding your Ozempic pen is easier when you track your progress using our Ozempic Weight Loss Timeline resource.
Selecting and Setting Your Correct Dose
Your healthcare provider will prescribe a specific Ozempic dose, typically starting at 0.25 mg for the first four weeks, then increasing to 0.5 mg, and potentially to 1 mg or 2 mg depending on your treatment goals.
To set your dose, turn the dose selector until the dose counter displays your prescribed amount. If you turn past your dose, you can dial backward without wasting medication. Always double-check the dose counter before injecting. If you're reviewing how to inject Ozempic and forget a step or miss a scheduled injection, consult our guide, 'What Happens If You Miss an Ozempic Dose?' for specific instructions.
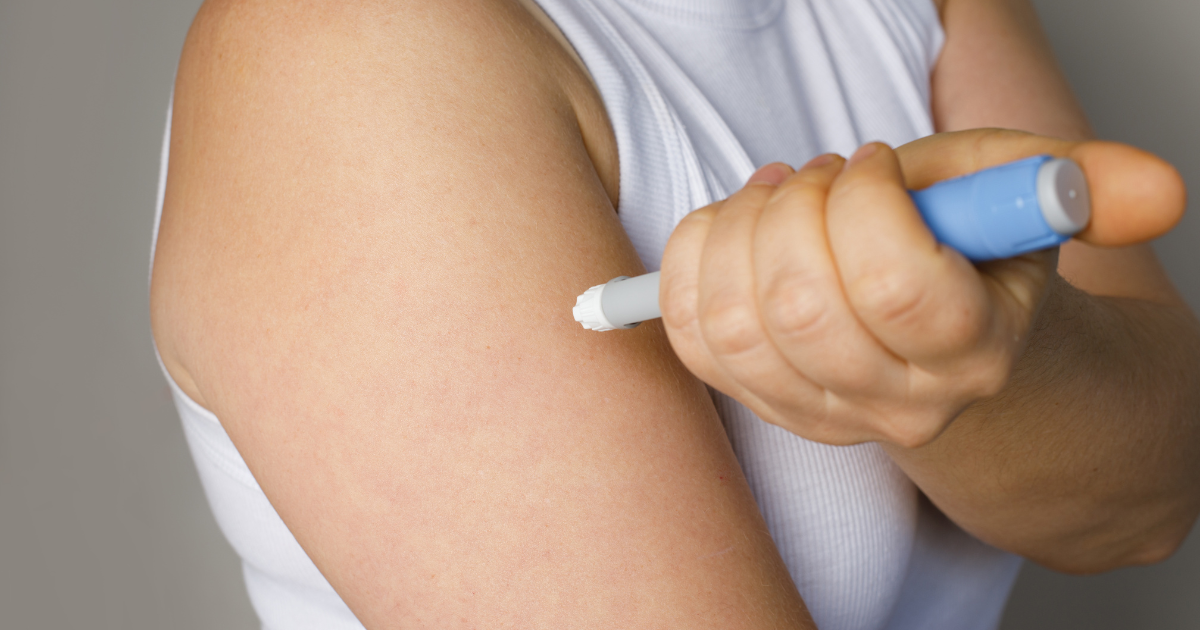
Best Injection Sites and Why Rotation Matters
Knowing how to inject Ozempic includes understanding where to inject it. Ozempic should be injected subcutaneously (under the skin) in areas with adequate fatty tissue:
- Abdomen: The front of your belly, at least 2 inches away from your belly button
- Thigh: The front or outer area of your upper leg
- Upper arm: The back or outer area (may require assistance)
Rotating your injection sites is essential for preventing lipodystrophy. This condition occurs when repeated injections in the same spot cause lumps or tissue changes, which can affect the absorption of medication. If you're learning how to inject Ozempic, create a simple rotation schedule—for example, alternate between your abdomen and thighs each week.
Avoid injecting into areas that are tender, bruised, red, stiff, scarred, or within 2 inches of stretch marks.
Steps on How to Inject Ozempic:
After preparing your pen and choosing an injection site, follow these steps for proper administration — here's how to inject Ozempic:
Step 1: Clean the injection site with an alcohol swab using a circular motion. Let the area air dry completely.
Step 2: Gently pinch the skin between your thumb and forefinger to create a small fold.
Step 3: Insert the needle at a 90-degree angle with a quick, smooth motion.
Step 4: Press and hold the dose button all the way down until the dose counter returns to "0."
Step 5: Keep the needle in place for at least 6 seconds after the dose counter shows "0." Count slowly to ensure you receive the full dose.
Step 6: Release the dose button and remove the needle at the same angle. A small drop of blood or medication is normal.
Using Digivibe to Reduce Injection Discomfort
Many patients also struggle with anxiety around self-injections, wondering Is it Normal to Be Afraid of Needles? The answer is yes—needle anxiety affects millions of people.
For a deeper look at needle anxiety and treatment options, please read our guide on Needle Phobia: Causes and Treatments. Learning safe injection routines goes hand in hand with managing other aspects of chronic conditions.
How to use Digivibe with your Ozempic injection:
Place the Digivibe device on your skin at the intended injection site before cleaning with alcohol. Turn it on to activate the gentle vibration. The vibrating sensation creates a "distraction signal" that travels to your brain faster than pain signals, reducing discomfort when the needle penetrates your skin.
Many patients rely on injection-comfort devices like the Digivibe Product Page describes, which uses vibration technology based on the Gate Control Theory of Pain. The research behind this technology shows how micro-pulses can interrupt pain perception, as explained on the Science of Digivibe page.


Proper Disposal of Needles and Pens
When learning how to inject Ozempic, also knowing how to safely dispose of it is a critical part of learning how to inject Ozempic at home. Never recap needles—this is the leading cause of accidental needle sticks. Instead, immediately place used needles in an FDA-approved sharps container.
If you don't have a sharps container, use a heavy-duty plastic container with a screw-on lid, such as a laundry detergent bottle. Never use glass containers or regular trash bins.
Always follow official medical guidelines by checking the FDA – Ozempic Instructions for Use for current disposal recommendations. Safe disposal and clean technique are also emphasized by the CDC – Safe Injection Practices guidelines.
When your Ozempic pen is empty, dispose of it in accordance with local regulations. Many communities offer sharps mail-back programs or drop-off locations at pharmacies.
Common Mistakes to Avoid When Injecting Ozempic
Even experienced patients can make errors. Avoid these common mistakes when you learn how to inject Ozempic:
Not rotating injection sites: Using the same spot repeatedly can cause tissue damage and reduce medication absorption.
Injecting cold medication: Allow the pen to reach room temperature for 15-30 minutes before injection to reduce discomfort.
Rushing the injection: Not holding the dose button long enough results in receiving less than your full dose.
Skipping the flow check: Failing to prime your pen can result in air bubbles and inaccurate dosing.
Reusing needles: Using the same needle multiple times increases infection risk and causes more pain.
Injecting into muscle: Inserting the needle at the wrong angle may alter absorption rates and increase discomfort.
Safety Reminders and When to Contact Your Doctor
While most people master how to inject Ozempic without complications, certain situations require medical attention:
Contact your healthcare provider if you experience persistent redness, swelling, or warmth at injection sites, hard lumps forming under your skin, difficulty breathing or swallowing, severe rash or hives, or severe abdominal pain.
Always store unused Ozempic pens in the refrigerator at a temperature between 36°F and 46°F. Once in use, you may store your pen at room temperature (below 86°F) for up to 56 days. Never freeze Ozempic.
If you're traveling, use an insulated medication travel case with a cool pack. Airport security allows syringes and injectable medications in carry-on bags, provided they are accompanied by proper documentation.
Building Confidence with Each Injection
Mastering how to inject Ozempic becomes easier with practice. Most patients report that by their third or fourth injection, the process feels routine. The key is to follow these steps consistently and maintain proper technique.
If you continue to experience anxiety after several weeks, consider asking a family member to assist or discuss alternative options with your healthcare provider. Some patients benefit from working with a diabetes educator who can provide hands-on training.
Remember that taking Ozempic as prescribed is an integral part of managing your health. By mastering the injection technique and incorporating comfort tools like Digivibe, you can maintain consistent treatment while minimizing discomfort and anxiety. With the right approach and preparation, self-injection becomes a manageable part of your weekly routine, empowering you to take control of your diabetes management or weight loss journey from the comfort of your own home.
Share:
1 comment
-
The tip about holding the dose button for 6 seconds is spot on, a lot of people pull out to early and dont get their full dose. For anyone using an ozempic injection as part of a structured fat elimination program, the site rotation advice here is somthing you really cant skip. Injecting in the same spot slows down how well the medication absorbs, which can effect your results over time. Letting the pen warm up before injecting also makes a bigger diffrence than most people expect with comfort and consistancy.
John Miller on
Disclaimer: This blog is intended for general informational purposes only and does not constitute or substitute for professional medical advice, diagnosis, or treatment. Suthe does not provide medical services, and no content herein should be used to make healthcare decisions without first consulting a licensed healthcare provider. Always seek the guidance of a qualified medical professional regarding your health, wellness practices, or the use of any medical or wellness devices.